Eğitimler
KeyboardReprogram
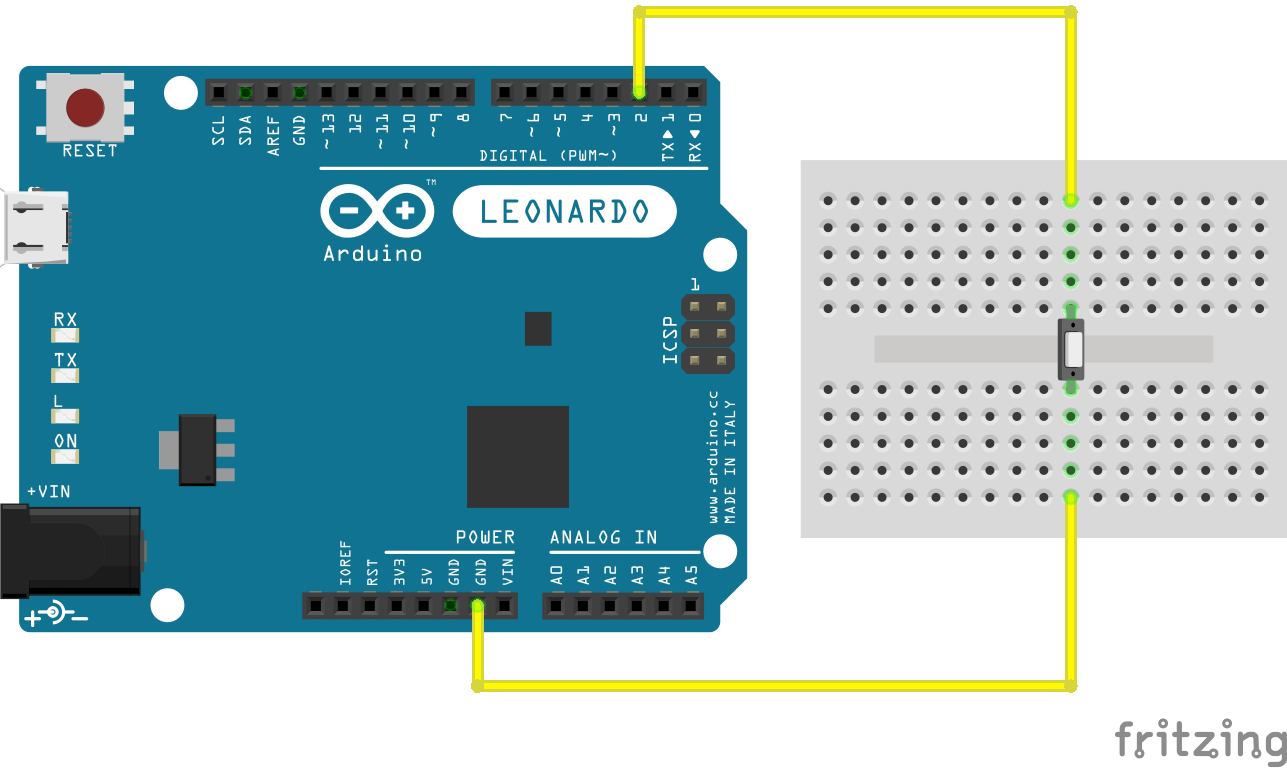
Bu örnek, yeni bir Arduino Yazılımı (IDE) çizim penceresi açmak, Blink örneğinde yazılan klavye komutlarını göndermek ve kartı yeniden programlamak için Klavye kitaplığını kullanır. Bu çizimi çalıştırıp pimi 2 düğmeyi kullanarak toprağa bağladıktan sonra kartta yeni bir program olan Blink olacaktır.
NB: Keyboard.print () komutunu kullandığınızda, Arduino bilgisayarınızın klavyesini devralır! Bu işlevle bir çizim çalıştırırken bilgisayarınızın kontrolünü kaybetmemenizi sağlamak için Keyboard.print () öğesini aramadan önce güvenilir bir kontrol sistemi kurduğunuzdan emin olun. Bu çizim yalnızca dijital pin 2 toprağa çekildikten sonra Klavye komutlarını göndermek için tasarlanmıştır.
Gerekli Donanım
- Arduino Leonardo, Micro veya Due board
- butona basınız
- bağlantı telleri
- breadboard
Yazılım Gerekli
- Arduino IDE çalışıyor
Devre
büyütmek için resme tıklayın

Şematik
büyütmek için resme tıklayın 
Kod
Kartınızı USB bağlantı noktasına bağlayın, ardından D2'yi GND ile bağlamak için tuşa basın ve çizim klavye tuş basımı öykünmesini başlatın. Düğmeye basmadan önce Arduino Yazılımı (IDE) penceresini seçmeyi unutmayın.
Arduino Programs Blink
This sketch demonstrates the Keyboard library.
For Leonardo and Due boards only.
When you connect pin 2 to ground, it creates a new window with a key
combination (CTRL-N), then types in the Blink sketch, then auto-formats the
text using another key combination (CTRL-T), then uploads the sketch to the
currently selected Arduino using a final key combination (CTRL-U).
Circuit:
- Arduino Leonardo, Micro, Due, LilyPad USB, or Yún
- wire to connect D2 to ground
created 5 Mar 2012
modified 29 Mar 2012
by Tom Igoe
modified 3 May 2014
by Scott Fitzgerald
This example is in the public domain.
http:egitim.aspx?e=KeyboardReprogram
*/
#include "Keyboard.h"
// use this option for OSX.
// Comment it out if using Windows or Linux:
char ctrlKey = KEY_LEFT_GUI;
// use this option for Windows and Linux.
// leave commented out if using OSX:
// char ctrlKey = KEY_LEFT_CTRL;
void setup() {
// make pin 2 an input and turn on the pull-up resistor so it goes high unless
// connected to ground:
pinMode(2, INPUT_PULLUP);
// initialize control over the keyboard:
Keyboard.begin();
}
void loop() {
while (digitalRead(2) == HIGH) {
// do nothing until pin 2 goes low
delay(500);
}
delay(1000);
// new document:
Keyboard.press(ctrlKey);
Keyboard.press('n');
delay(100);
Keyboard.releaseAll();
// wait for new window to open:
delay(1000);
// versions of the Arduino IDE after 1.5 pre-populate new sketches with
// setup() and loop() functions let's clear the window before typing anything new
// select all
Keyboard.press(ctrlKey);
Keyboard.press('a');
delay(500);
Keyboard.releaseAll();
// delete the selected text
Keyboard.write(KEY_BACKSPACE);
delay(500);
// Type out "blink":
Keyboard.println("void setup() {");
Keyboard.println("pinMode(13, OUTPUT);");
Keyboard.println("}");
Keyboard.println();
Keyboard.println("void loop() {");
Keyboard.println("digitalWrite(13, HIGH);");
Keyboard.print("delay(3000);");
// 3000 ms is too long. Delete it:
for (int keystrokes = 0; keystrokes < 6; keystrokes++) {
delay(500);
Keyboard.write(KEY_BACKSPACE);
}
// make it 1000 instead:
Keyboard.println("1000);");
Keyboard.println("digitalWrite(13, LOW);");
Keyboard.println("delay(1000);");
Keyboard.println("}");
// tidy up:
Keyboard.press(ctrlKey);
Keyboard.press('t');
delay(100);
Keyboard.releaseAll();
delay(3000);
// upload code:
Keyboard.press(ctrlKey);
Keyboard.press('u');
delay(100);
Keyboard.releaseAll();
// wait for the sweet oblivion of reprogramming:
while (true);
}
See Also
- Keyboard.write()
- Keyboard.print()
- Keyboard.println()
- KeyboardLogout- Geçerli kullanıcıyı tuş komutlarıyla kapatır.
- KeyboardMessage- Bir düğmeye basıldığında bir metin dizesi gönderir.
- KeyboardSerial- Seri porttan bir bayt okur ve bir tuş vuruşu geri gönderir.
- KeyboardAndMouseControl- Fare ve Klavye komutlarını tek bir programda gösterir.
- ButtonMouseControl- 5 buton ile imleç hareketini kontrol edin.
- JoystickMouseControl- Bir düğmeye basıldığında bilgisayarın imleç hareketini bir Joystick ile kontrol eder.
