Eğitimler
StateChangeDetection
Bir düğme çalıştıktan sonra, genellikle düğmeye kaç kez basıldığına bağlı olarak bazı eylemler yapmak istersiniz. Bunu yapmak için, düğmenin durumu ne zaman kapalıdan açıka değiştirdiğini bilmeniz ve bu durum değişikliğinin kaç kez gerçekleştiğini saymanız gerekir. Buna durum değişikliği algılama veya kenar algılama denir . Bu öğreticide durum değişikliğini nasıl kontrol edeceğimizi öğreniyoruz, Seri Monitöre ilgili bilgileri içeren bir mesaj gönderiyoruz ve bir LED'i açmak ve kapatmak için dört durum değişikliğini sayıyoruz.
Gerekli Donanım
- Arduino veya Genuino Kurulu
- anlık düğme veya anahtar
- 10k ohm direnç
- bağlantı telleri
- breadboard
Devre
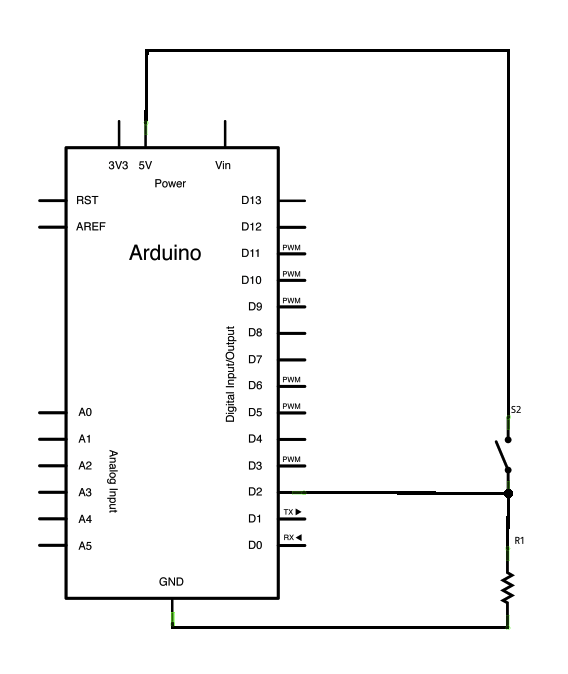
Karta üç kablo bağlayın. Birincisi, düğmenin bir bacağından aşağı çekme direnci (burada 10k ohm) ile toprağa gider. İkincisi, düğmenin karşılık gelen ayağından 5 voltluk beslemeye gider. Üçüncüsü, düğmenin durumunu okuyan bir dijital I / O pinine (burada pin 2) bağlanır.
Buton açıkken (basılı değil), butonun iki ayağı arasında bağlantı yoktur, bu nedenle pim toprağa bağlanır (aşağı çekme direnci ile) ve DÜŞÜK okuruz. Düğme kapatıldığında (basıldığında), iki ayağı arasında bir bağlantı kurar, pimi voltaja bağlar, böylece YÜKSEK okuruz. (Pim hala toprağa bağlı, ancak direnç akım akışına direniyor, bu nedenle en az direnç yolu + 5V'ye.)
Dijital I / O pimini her şeyden çıkarırsanız, LED düzensiz yanıp sönebilir. Bunun nedeni, girişin "yüzer" olmasıdır - yani, gerilime veya toprağa bağlı değildir. Az ya da çok rastgele YÜKSEK veya DÜŞÜK döner. Bu yüzden devrede bir aşağı çekme direncine ihtiyacınız var.
Şematik
büyütmek için resme tıklayın

Kod
Aşağıdaki çizim sürekli olarak düğmenin durumunu okur. Daha sonra ana döngü aracılığıyla düğmenin durumunu son kez durumuyla karşılaştırır. Geçerli düğme durumu son düğme durumundan farklıysa ve geçerli düğme durumu yüksekse, düğme kapalı durumdan açık konuma değişir. Çizim daha sonra bir düğme basma sayacını artırır.
Çizim ayrıca düğme itme sayacının değerini kontrol eder ve dördün katlarıysa, pim 13'teki LED'i AÇIK konuma getirir. Aksi takdirde, kapatır.
/*
  State change detection (edge detection)

  Often, you don't need to know the state of a digital input all the time, but
  you just need to know when the input changes from one state to another.
  For example, you want to know when a button goes from OFF to ON. This is called
  state change detection, or edge detection.

  This example shows how to detect when a button or button changes from off to on
  and on to off.

  The circuit:
  - pushbutton attached to pin 2 from +5V
  - 10 kilohm resistor attached to pin 2 from ground
  - LED attached from pin 13 to ground (or use the built-in LED on most
    Arduino boards)

  created  27 Sep 2005
  modified 30 Aug 2011
  by Tom Igoe

  This example code is in the public domain.

  http://www.arduino.cc/en/Tutorial/ButtonStateChange
*/

// this constant won't change:
const int  buttonPin = 2;    // the pin that the pushbutton is attached to
const int ledPin = 13;       // the pin that the LED is attached to

// Variables will change:
int buttonPushCounter = 0;   // counter for the number of button presses
int buttonState = 0;         // current state of the button
int lastButtonState = 0;     // previous state of the button

void setup() {
  // initialize the button pin as a input:
  pinMode(buttonPin, INPUT);
  // initialize the LED as an output:
  pinMode(ledPin, OUTPUT);
  // initialize serial communication:
  Serial.begin(9600);
}


void loop() {
  // read the pushbutton input pin:
  buttonState = digitalRead(buttonPin);

  // compare the buttonState to its previous state
  if (buttonState != lastButtonState) {
    // if the state has changed, increment the counter
    if (buttonState == HIGH) {
      // if the current state is HIGH then the button went from off to on:
      buttonPushCounter++;
      Serial.println("on");
      Serial.print("number of button pushes: ");
      Serial.println(buttonPushCounter);
    } else {
      // if the current state is LOW then the button went from on to off:
      Serial.println("off");
    }
    // Delay a little bit to avoid bouncing
    delay(50);
  }
  // save the current state as the last state, for next time through the loop
  lastButtonState = buttonState;


  // turns on the LED every four button pushes by checking the modulo of the
  // button push counter. the modulo function gives you the remainder of the
  // division of two numbers:
  if (buttonPushCounter % 4 == 0) {
    digitalWrite(ledPin, HIGH);
  } else {
    digitalWrite(ledPin, LOW);
  }

}
See Also
- pinMode()
- digitalWrite()
- digitalRead()
- millis()
- if
- BlinkWithoutDelay- delay () işlevini kullanmadan bir LED'i yanıp sönün.
- Button- Bir LED'i kontrol etmek için bir düğme kullanın.
- Debounce- Gürültüyü filtreleyen bir düğme okuyun.
- DigitalInputPullup- pinMode () ile INPUT_PULLUP kullanımını gösterir.
- toneKeyboard- Kuvvet sensörleri ve piezo hoparlör kullanan üç tuşlu müzikal klavye.
- toneMelody- Piezo hoparlörle bir melodi çalın.
- toneMultiple- tone () komutunu kullanarak birden fazla hoparlörde tonları sırayla çalın.
- tonePitchFollower- Analog girişe bağlı olarak bir piezo hoparlörde bir perde çalın.

