
Eğitimler
BarGraph
Çubuk grafik - bir ses ekranında gördüğünüz gibi bir hattaki bir dizi LED - analog sensörler için ortak bir donanım ekranıdır. Arka arkaya bir dizi LED , bir potansiyometre gibi bir analog giriş ve aradaki küçük bir koddan oluşur. Sen gibi, oldukça ucuza çoklu LED çubuk grafik görüntüler satın alabilirsiniz bu bir . Bu eğitici, bir dizi LED'in arka arkaya nasıl kontrol edileceğini gösterir, ancak herhangi bir dijital çıkış serisine uygulanabilir.
Bu eğitim Döngü ve Diziler öğreticisinin yanı sıra Analog Giriş öğreticisinden ödünç alır.

Gerekli Donanım
- Arduino veya Genuino Kurulu
- LED çubuk grafik ekran veya 10 LED
- Potansiyometre
- 10 220 ohm direnç
- bağlantı telleri
- breadboard
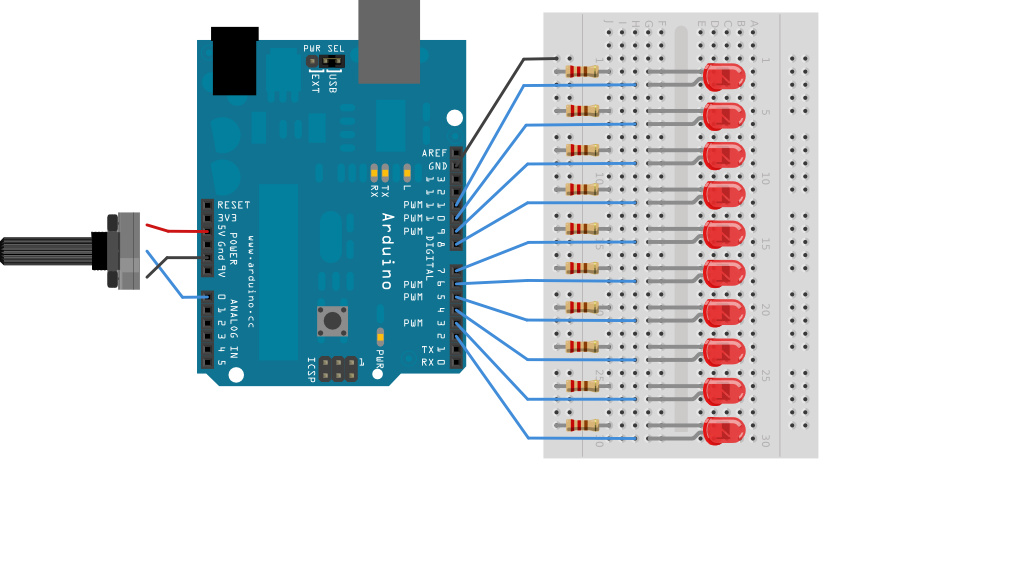
Devre
büyütmek için resme tıklayın
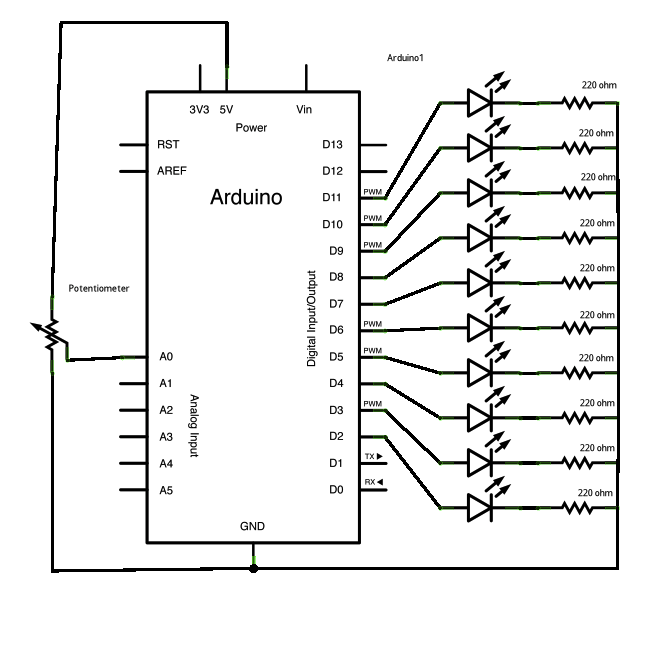
Şematik:
büyütmek için resme tıklayın
Kod
Çizim şu şekilde çalışır: önce girişi okursunuz. Giriş değerini çıkış aralığına, bu durumda on LED'e eşlersiniz . Sonra çıkışları yinelemek için bir for döngüsü ayarladınız. Serideki çıkışın numarası, eşlenen giriş aralığından düşükse açarsınız. Değilse, kapatırsınız.
/*
  LED bar graph

  Turns on a series of LEDs based on the value of an analog sensor.
  This is a simple way to make a bar graph display. Though this graph uses 10
  LEDs, you can use any number by changing the LED count and the pins in the
  array.

  This method can be used to control any series of digital outputs that depends
  on an analog input.

  The circuit:
  - LEDs from pins 2 through 11 to ground

  created 4 Sep 2010
  by Tom Igoe

  This example code is in the public domain.

  http://www.arduino.cc/en/Tutorial/BarGraph
*/

// these constants won't change:
const int analogPin = A0;   // the pin that the potentiometer is attached to
const int ledCount = 10;    // the number of LEDs in the bar graph

int ledPins[] = {
  2, 3, 4, 5, 6, 7, 8, 9, 10, 11
};   // an array of pin numbers to which LEDs are attached


void setup() {
  // loop over the pin array and set them all to output:
  for (int thisLed = 0; thisLed < ledCount; thisLed++) {
    pinMode(ledPins[thisLed], OUTPUT);
  }
}

void loop() {
  // read the potentiometer:
  int sensorReading = analogRead(analogPin);
  // map the result to a range from 0 to the number of LEDs:
  int ledLevel = map(sensorReading, 0, 1023, 0, ledCount);

  // loop over the LED array:
  for (int thisLed = 0; thisLed < ledCount; thisLed++) {
    // if the array element's index is less than ledLevel,
    // turn the pin for this element on:
    if (thisLed < ledLevel) {
      digitalWrite(ledPins[thisLed], HIGH);
    }
    // turn off all pins higher than the ledLevel:
    else {
      digitalWrite(ledPins[thisLed], LOW);
    }
  }
}
See Also
- pinMode()
- for()
- digitalWrite()
- if...else
- map()
- For Loop Iteration- Bir Döngü için birden fazla LED'i kontrol edin.
- Arrays- Döngü için örneğinde bir dizinin nasıl kullanılacağını gösteren bir varyasyon.
- Row Column Scanning- 8x8 LED matrisinin nasıl kontrol edileceği.